
Webflow Tutorial: The Ultimate Guide to No-Code Learning
Introduction
If you are a business owner, chances are you’ve tinker with the idea of building a website by yourself or employing the service of a professional web developer. However, the amount of time needed to learn how to code is usually long, and the cost of hiring a developer is usually high. So how do you now come up with a website for your business?
What if you found another way of building a website without the help of any code? That’s hugely possible. With a no-code tool like Webflow, you’ll have the freedom to design, customize and create your website in a jiffy.
In this ultimate guide to webflow, we’ll be diving into everything you need to know to become proficient in this no-code web design tool. Whether you are a designer, marketer, entrepreneur, or anyone interested in building websites without coding, this guide will equip you with the necessary knowledge and skills to create impressive web projects.
What’s Webflow?
Webflow is a software as a service (SaaS) platform that allows individuals and businesses to design, build and create visually appealing websites without learning to code or hiring a developer. The platform has a plethora of in-built templates which you can customize to your taste and build the perfect website for your Business.
Webflow uses the three basic building blocks of a website which are HTML, CSS, and JavaScript to power the visual editors, and generate semantic codes for your website. This means you don’t have to understand the three languages before making a website. By just dragging and dropping the visuals, you can build exceptionally appealing websites.
Advantages of Using Webflow
Ability to view the prototype of your website live
Intuitive user interface
Website can be migrated to another hosting platform
Requires no external plugin
Fast development process
On the spot editing of content using the webflow editor
Disadvantages of Using webflow
Everything has to be done on desktop
Relatively high pricing plans
Not good for creating e-commerce site
Steep learning curve especially for beginners
Webflow between no-code and low-code websites solution
While webflow has been majorly classified as a no-code tool, it has sometimes been referred to as a low code tool. So what’s a no-code and a low code tools
Defining a no-code tool
A no-code tool is a software solution that allows the building of websites without needing to code. It uses functionalities such as intuitive user interface, built-in templates, drag and drop components and pages customization which users can tailor to their needs and preferences. With a no-code tool, users are constrained in their abilities. They can only work with the generated codes but can not make changes to it
Defining a low-code tool
In contrast, a low code tool gives flexibility to change the custom code. Since the codes are generated using HTML, CSS, and JavaScript, a low code tool allows users access to the code base and they can customize it to their preferences. For example, you may not be contented with a CSS class or a JavaScript function, low-code allows you to change the code, not just the visuals.
Verdict : Going by the definitions above, webflow lies in-between a no-code tool and a low-code tool. This is because, it allows users to make changes to the visuals with no-code and also allows users to make changes to the code base with low-code
Getting Started with Webflow
Here’s how to get started using the power of webflow
Creating an Account
Before you can be able to use the webflow platform, you’ll have to register an account on the platform. Here’s a step by step guide to create an account
Visit the webflow website www.webflow.com and navigate your way to the Get started button
Click on the ‘Get Started’ button to navigate to the account creation page
On the registration page, enter your details including your name, email and password
Once you’ve input your credentials, click on the ‘Create account’ button
You’ll be required to answer some questions detailing what you want to use the platform for
You’ll be taken to the dashboard after the question drilling.

Navigating the Webflow Dashboard
Now that you’ve set up your account, the next thing is to get acquainted with the webflow dashboard. The following components make up the webflow dashboard
Projects
This is the warehouse of all your webflow projects. Regardless of the type of website you want to build, this is where they would be stored. Whether you are building a personal portfolio website or a business website for clients, there is a dedicated website for each of your projects.
Designer
This is the fulcrum of your project dashboard where you can design and create visually appealing websites. The designer component converts your mockup designs into the language of the web. It has drag and drop features and customized styles to help designers develop standard websites without sacrificing quality.
Templates
With webflow, you have two options. You can start your project completely from scratch or you can use the prebuilt templates to create your website. The templates come with a customization option which allows you to make changes and tweak the designs to your needs and preferences.
Content Management System
In the CMS, you take control over the content of your website. It allows you to structure, manage and organize your content before publishing. The type of content you may want to publish include blog posts, product listings and collections, product reviews, etc.
E-commerce
Webflow has a dedicated space for e-commerce business. If you desire to venture into creating online stores, webflow ecommerce page will give you all the tools needed to get started. You can also integrate payment gateways to your online stores, webflow has several payment integration including PayPal, Stripe, Google Pay etc.
Hosting
When your website is ready for production, this is where you’ll showcase it to your audience. The webflow hosting is speedily fast, reliable and secure. It comes with free SSL and HTTPS which enhance your site security.
Understanding the Webflow Designer Interface
The webflow designer interface is where the magic happens. It houses all the tools and instruments you will use for your website creation. It comprises features such as Navigator, pages, asset manager, style panel, interactions etc.
Creating and Editing Pages
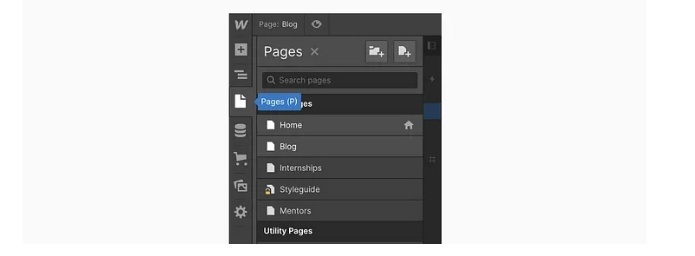
While in your project dashboard, you can start to create and edit your website. Webflow has an in-built editor that allows you to edit content on the go. To access the editor, click on the three dot on the bottom right corner of your project, a pop up will appear and you can choose the Editor tab.
You can also access the Editor mode right on the designer interface. To do this, locate and click the ‘W’ at the upper left corner of the designer mode, therein, you’ll find the Editor button.
In the Editor interface, you can format text, add styles, create lists, add photos and videos. To know whether a content is editable, simply hover around the content, a pencil icon will appear signifying that it is editable, you can then edit your content on the spot. Editing buttons is a bit more advanced. To edit a button, hover around the button and a setting icon containing two options will appear. The first option is to edit the links of the button and the second option is to edit the button text. Note that before you could be able to view your changes, you will have to publish your website.
Adding Elements and Components
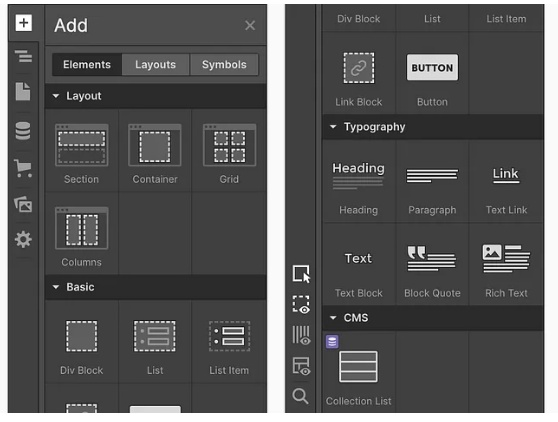
If you are conversant with HTML, you’ll easily navigate your way around Webflow elements and components. The top-left side of the designer interface contains the markup and the style buttons.
In the markup buttons, you have the Add Elements panel where you can add all the HTML elements such as divs, buttons, text, images, form and more. There is also the Navigator which allows you to organize your components and make it reusable on multiple pages.
Styling and Layouts
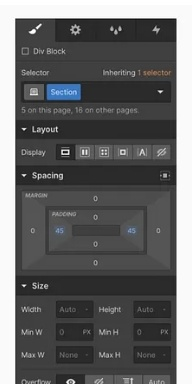
The appealing visuals of your website is done through styling and layouts. You can add all type of styles including margin, padding, color, border, width, height and position. Assuming you want to style each of your elements uniquely, you can use the ‘Selector’ field located in the style panel. This allows you to customize your styling using the utility CSS classes.
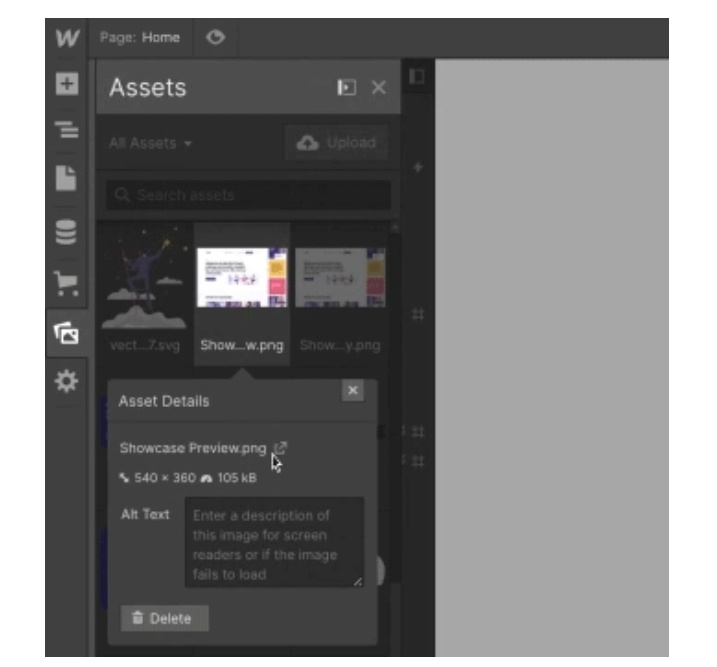
Utilizing the Asset Manager
You can find the assets manager at the top left of the designer interface. In the assets manager, you can upload, structure, sort and manage your asset folders. You can also directly import your assets into the webflow canvas. This could be done by dragging an image or file and then dropping it into the canvas. After, the drag and drop, your file automatically stores in the assets manager and is eligible to be reused.
Interaction and Animation tools
Webflow provides a space for making cool animations and transitions for your website. In-built by the power of CSS and JavaScript, the webflow animation tools empower designers to build a hitch-free animation seamlessly.
Building Responsive Websites
Responsiveness is the hallmark of a modern websites. With the traditional coding method, you might be thinking of media queries, or using CSS libraries such as Bootstrap, Tailwind or Bulma to make your website responsive. However, webflow has done all the behind the scenes work of your website responsiveness. By clicking on the Grid button, you have all the necessary tools to adjust and make your website work on all devices.
To use the Grid, find the Navigator menu, and select the Grid. For example, if you have an image that’s squishing to the sideways, you can adjust the Right Column Grid and Left Column Grid equally and then center the image by clicking justify content.
Webflow CMS
The webflow CMS is where you take control of your website content. With the CMS, you designed the type of content that will appear on your website.
How to create and manage content with CMS
To create content on the webflow CMS, you need to create a collection. It is from this collection that you can then refer each of your content.
You can also separate content type into their unique collection. Let’s say you have different content type including blog posts, products listing, reviews, team members, etc. You can create a collection for blog posts, another collection for product listings and more.
How to reference your website content
Having organize your collection, you can then add content to each of the collection. Webflow allows you to reference your content either by using the collection list or the collection page.
With the collection lists, you can reference your content on any website. Collection lists also allows you to filter, and sort your content. The second way of referencing your content is by using the collection page. This is an automatic template design that is created every time you create or update an item in your collection.
How to publish your website changes and updates
You may want your website to go live after designing it to your taste and it becomes production-ready. You can publish your website either in the designer or the Editor interfaces.
To publish your website in the designer interface,
locate the publish menu,
check the type of domain pool l link Kop you want to publish
publish the chosen domain.
To use the editor’s mode,
click on the publish button to have a preview,
click publish changes
Webflow pricing
Webflow has different pricing options with varying degrees of features. Although Webflow has a free plan, but that can barely a serve you as it is only made for learning how to use the platform. If you only want to create a simple website, the basic plan which is billed for $14 per month should serve you. However, if you desire to create stunning website with advanced features, you may have to go for either the CMS or business plans which are all available for $23 and $39 respectively.
Conclusion
In summary, Webflow proves to be remarkably impressive. It provides a leeway for non-coders to get into the realm of website designing and development. Even individuals who may be hesitant about visual builders will appreciate its excellence due to its user-friendly nature and its ability to produce well-structured, clean code. Moreover, by seamlessly integrating HTML and CSS principles within a visual interface, Webflow offers valuable insights into the coding process, enhancing your comprehension of how everything comes together, even if you are not conversant with the actual coding process.


Fantastic site Lots of helpful information here I am sending it to some friends ans additionally sharing in delicious And of course thanks for your effort